
· 2 min read
Kas J

Over the past couple of weeks, I've been experimenting quite a bit on my server (installing, uninstalling, changing config everywhere). Before I started installing and using my apps in anger I thought it might be best to start clean. This was also a great opporunity to learn Ansible to automate the entire cluster set up.

I've been using Terraform quite a bit as part of my day job and for me Ansible is Terraform's perfect partner in crime. Terraform sets up the infrastructure and Ansible then goes over the top and installs the configuration. Both tools operate under the same way, configurations describe the state that you need in a declarative manner. So for cluster set up my target is to automate the following tasks after a fresh version of Ubuntu is installed:

  1. Install K3s
  2. Install load balancer Metallb
  3. Install NFS server
  4. Install reverse proxy Traefik
  5. Install Cert Manager and Certificates
  6. Install ArgoCD (which will deploy all my apps - more on this in a future post)

Ansible playbooks and roles

Ansible configurations are written in a file which contains all the various config tasks that are needed to be run along with instructions to execute these tasks called ansible playbooks. You could theoretically write one big playbook to automate all the tasks above but it is easier to keep things modular. This is where ansible roles comes in - roles are simply a more modular version of a playbook which contains its own file structure, variables and handlers. More importantly for me, grouping things by roles allow you to share your playbooks easier with other users.

Through the wonderful open source community I was able to source some great roles through Ansible galaxy (Ansible role marketplace) and Github, I was able to source and tweak the following roles:

Honestly, I didn't need to make many tweaks to these playbooks at all, if anything I needed to remove tasks because they were doing more than I needed to do. All I needed to do was point these playbooks to my local servers, ensure I had SSH connectivity and the playbooks did the rest - Pretty cool!

· 3 min read
Kas J

One of the biggest reasons for creating a homelab is I wanted the ability to leverage the some of the great services and solutions that were available in the public cloud within the safety of my home network where my data was out of reach in the wild world of the internet. I can't think of a better example of this than Password Management.

The last 12 months have been incredibly eye opening for a lot of folks when it comes to data privacy with some pretty large breaches impacting millions of people. The Office of the Australian Information Commissioner reports 497 breaches were notified compared with 393 in January to June 2022 – a 26% increase, most of which were malicious or criminal attacks.

So many of us (me included) have so many accounts/subscriptions/emails, it is very hard for us to keep up with strong password requirements and practices. Luckily for us there are a number of excellent solutions to generate and manage passwords for us so we don't have to. Passwords can now be long and complicated which dramatically reduce the chances of being hacked or exploited.

I've been using LastPass for a number of years and has served me well however late last year I was reminded that there will be attempts to access your data. In December 2022, "an unauthorized party gained access to a third-party cloud-based storage service, which LastPass uses to store archived backups of our production data. Whilst no customer data was accessed during the August 2022 incident, some source code and technical information were stolen from our development environment and used to target another employee, obtaining credentials and keys which were used to access and decrypt some storage volumes within the cloud-based storage service." source

I know, no customer data was stolen and even if the customer data was stolen, it is all encrypted anyway. Also, if I wasn't using LastPass, there was far more of chance I re-use or use weak passwords making it more likely to be exploited.

There is always a self-hosted alternative

Having a free, open-source alternative to a service I would've normally paid for is awesome but this one felt really good. Enter Bitwarden. It is a fantastic, self-hosted, free alternative password manager that does pretty much everything LastPass does (all the features I've been using anyway). Passwords are encrypted, it comes with an official Android and IoS app so that you can access your passwords from your phone and most importantly everything is stored locally.

Installing Bitwarden

I was gearing up to write some manifests when I found a great repo that had some great ones pre-written. Some minor tweaks and it all deployed fine.

One thing I deliberately didn't configure was a mail server (which Bitwarden needs to send out an email verification or send you a password hint if needed). I plan on revisiting this after I deploy a small mail server later.

Using Bitwarden

Using Bitwarden couldn't be easier either, it even comes with a handy little [guide(https://bitwarden.com/help/import-from-lastpass/)] to help you import all your passwords from LastPass

bitwarden

Closing thoughts

Password managers are a must have service for everyone and whilst there are a number pretty great cloud-based password managers out there (Google and Apple included), it is quite nice knowing that I don't have to store my data encrypted or otherwise on a server somewhere that isn't one that I own and know. For that reason (and really that reason alone) I'll be sticking to Bitwarden.

password

· 3 min read
Kas J

In an earlier post, I installed cert-manager to automatically manage my SSL certificates for TLS for my home-lab services. Given it was a set of services within my internal network, I was comfortable with issuing a single wildcard certificate *.local.kasj.live.

The problem

I've since realised a bit of an issue. The wildcard certificates that are issued are issued as a kubernetes secret resource which is specific to a namespace. This meant that in order for me to use the wildcard cert for all my services, I needed to deploy all my services into the same namespace (not ideal).

The research

Turns out there were many solutions to this, many of which I don't really understand but I tried anyway. This included:

The solution

I landed with a solution outline here and it still doesn't work how I want it to but its definitely a step forward.

The first few steps are exactly as I'd performed in my earlier post:

  1. Install Traefik
  2. Install Cert-Manager
  3. Set up Let's Encrypt as an Issuer

This is where I learnt something new:

  1. Issue a wilcard certificate in the same namespace as Traefik in my case this was the kube-system namespace - I also issued myself a new one here to keep things fresh *.home.kasj.live
/home-lab/cluster-setup/cert-manager/wildcard-cert.yaml
---
apiVersion: cert-manager.io/v1
kind: Certificate
metadata:
name: wildcard-home-kasj-live
namespace: kube-system
spec:
secretName: wildcard-home-kasj-live-tls
issuerRef:
name: letsencrypt-production
kind: ClusterIssuer
# commonName: "*.home.kasj.live"
dnsNames:
- "home.kasj.live"
- "*.home.kasj.live"

Traefik by default normally uses its own self-signed certificate for each ingress service that you define. What I needed to configure was something to tell Traefik to serve the new wildcard certifate I'd created instead. This can be done through a kubernetes resource called TLSStore.

  1. Create a TLSStore resource with the name default. According to the article above, it needed to be called default to be picked up by Traefik by default:
/home-lab/cluster-setup/cert-manager/tls-store.yaml
---
apiVersion: traefik.containo.us/v1alpha1
kind: TLSStore
metadata:
name: default
namespace: kube-system
spec:
defaultCertificate:
secretName: wildcard-home-kasj-live-tls"
  1. Restart Traefik deployment so that it knows to pick up the new cert by default

Testing the new solution

To test if Traefik was issuing my new wildcard certificate by default, I created a simple nginx server and exposed it using the following manifest on test.home.kasj.live:

//home-lab/prod-apps/nginx/ingress.yaml
---
apiVersion: networking.k8s.io/v1
kind: Ingress
metadata:
name: nginx
namespace: nginx
annotations:
kubernetes.io/ingress.class: traefik
traefik.ingress.kubernetes.io/redirect-entry-point: https
spec:
rules:
- host: test.home.kasj.live
http:
paths:
- backend:
service:
name: nginx
port:
number: 80
path: /
pathType: Prefix

Note: I've moved away from the IngressRoute resource to Ingress

Success! nginx nginx2

Now earlier, I mentioned it still wasn't working as I wanted it to and that's because there is still an issue with some services that already expose their services on SSL/HTTPS (Port 443) by default like nextcloud. Stay tuned for a future post on how I tackle that one but for now I'm going to enjoy this win.

winning

· 4 min read
Kas J

During the COVID period, we start using online grocery shopping with click and collect. It has actually been saving us a bit of money as we're not tempted with impulse purchases while walking up and down the ailes. The downside is that the process can actually be quite cumbersome.

What we do now:

  1. Spend ages looking for meal ideas for the week
  2. Collate a list of recipes
  3. Collate recipe ingredients
  4. Check the pantry and finalise shopping list
  5. Order items in shopping list

Now we haven't been necessarily doing it in that order either, we have been sporadically looking up recipe at a time and adding things to our online shopping cart over time, a lot of time. Now I don't think I can automate this completely but surely there was a better way to help reduce this time with a homelab app. Enter Mealie.

Mealie

Mealie is a self-hosted recipe manager and meal planner with a RestAPI backend and a reactive frontend application. It has some awesome features but the key ones I hope to leverage are:

  • Ability to create a custome recipe book by importing online recipes
  • Meal planner to choose our recipes for the week
  • Shopping list creator based on our meal plan

Installing Mealie

I'll be using the kompose convert method to install Mealie. I'm not going to cover it again but if you are interested check out my previous post as I installed Adguard Home with the same method.

The kompose convert command generated the following manifest files for me (I renamed them for my convenience):

  • 01-mealie-claim0-persistentvolumeclaim.yaml
  • 02-mealie-deployment.yaml
  • 03-mealie-service.yaml

Deploying these files using kubectl apply -f mealie/ deploys mealie in my cluster. Now what I need to do is expose this service to a webbrowser. If you've been following my previous posts, I've tried this in two ways, either giving it a network IP through Metallb or using my reverse proxy Traefik to route it through an internal domain. I'll be using the Traefik method today.

So to expose my service I create two additional files:

04-mealie-headers.yaml to specify some middleware to force https:

04-mealie-headers.yaml
apiVersion: traefik.containo.us/v1alpha1
kind: Middleware
metadata:
name: mealie-headers
namespace: mealie
spec:
headers:
browserXssFilter: true
contentTypeNosniff: true
forceSTSHeader: true
stsIncludeSubdomains: true
stsPreload: true
stsSeconds: 15552000
customFrameOptionsValue: SAMEORIGIN
customRequestHeaders:
X-Forwarded-Proto: https

05-mealie-ingress.yaml to specify my routing rule so that when I navigate to https://mealie.local.kasj.live Traefik will route to my mealie application:

05-mealie-ingress.yaml
apiVersion: traefik.containo.us/v1alpha1
kind: IngressRoute
metadata:
name: mealie-ingress
namespace: mealie
annotations:
kubernetes.io/ingress.class: traefik-external
spec:
entryPoints:
- websecure
routes:
- match: Host(`mealie.local.kasj.live`)
kind: Rule
services:
- name: mealie
port: 9925
middlewares:
- name: mealie-headers
tls:
secretName: local-kasj-live-tls

Testing mealie

Navigate to mealie.local.kasj.live and woot - we have an application!

mealie1

Cool feature #1 - Recipe Import. All I need to do is enter a recipe URL

mealie5

And mealie imports it for me!

mealie6

Once I have a bunch of recipes imported it is time for feature #2 - Weekly Meal Planner. I simply just pick from my imported recipes which is pretty quick!

mealie2

Sweet, now that I have weekly meal plan all I need is a shopping list. Hey look feature number #3 - Shopping List. Mealie takes all the ingredients from the meals you've selected in your weekly meal plan and throws them in a list for you.

mealie3

All we need to do now is trim the list based on what we have already, split the list between us and add to shopping cart!

mealie4

Closing thoughts

We've been using Mealie for about a week now and we've cut the time spent on grocery ordering signficantly. Happy wife - thanks mealie!

· 8 min read
Kas J

I've always been meaning to add an adblocker to my home network and now with the additional need to have internal hostnames for my services this would be a great time to put one in. There were two great open source solutions to consider:

  • Pihole - Pi-hole is a general purpose network-wide ad-blocker that protects your network from ads and trackers without requiring any setup on individual devices. It is able to block ads on any network device

  • Adguard Home - AdGuard Home is a network-wide software for blocking ads & tracking. After you set it up, it’ll cover ALL your home devices, and you don’t need any client-side software for that.

Honestly I really can't tell the difference so I decided to install both to trial!

Pihole

Installing Pihole

I wanted to create a bit of a file structure with all the required manifests which I can deploy at once:

  • 01-pihole-namespaces.yaml - manifest to create a namespace
  • 02-pihole-configs.yaml - manifest to specify configuration values such as whitelist domains and blocklists
  • 03-pihole-deployment.yaml - manifest to specify deployment of pihole such as the container location
  • 04-pihole-service.yaml - manifest to specify by port mappings and service exposure between container and pod
note

Worth noting here that I would normally be adding a pihole-ingress.yaml file here too to specify my traefik ingressRoute b resource but I won't be using traefik for this pihole or adguard home (as it will be a dns server)

I also found out that you can run kubectl apply -f on and entire folder which deploys all the manifests within the folder specified so in my case:
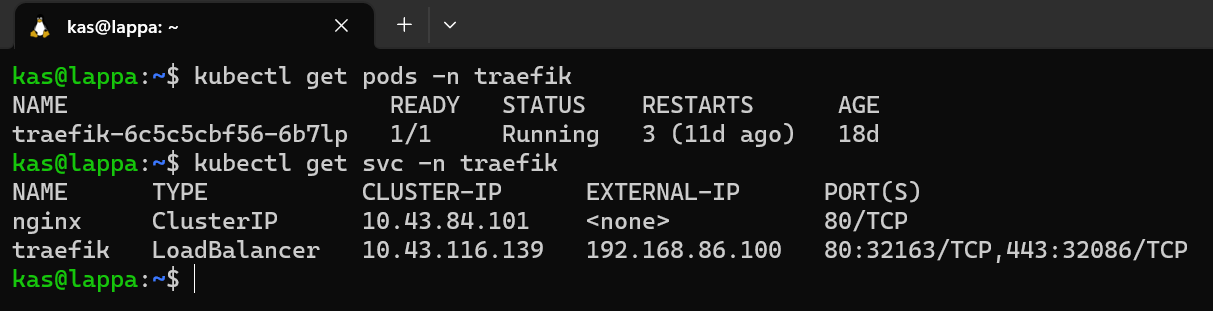
kubectl apply -f pihole/

Testing Pihole

As mentioned earlier, I didn't use Traefik for this service so I'm expecting that Metallb assigned a separate IP address allocated.

pihole

Looks good, so I just need to navigate to http://192.168.86.101/admin in my webbrowser to get to the admin portal

pihole2

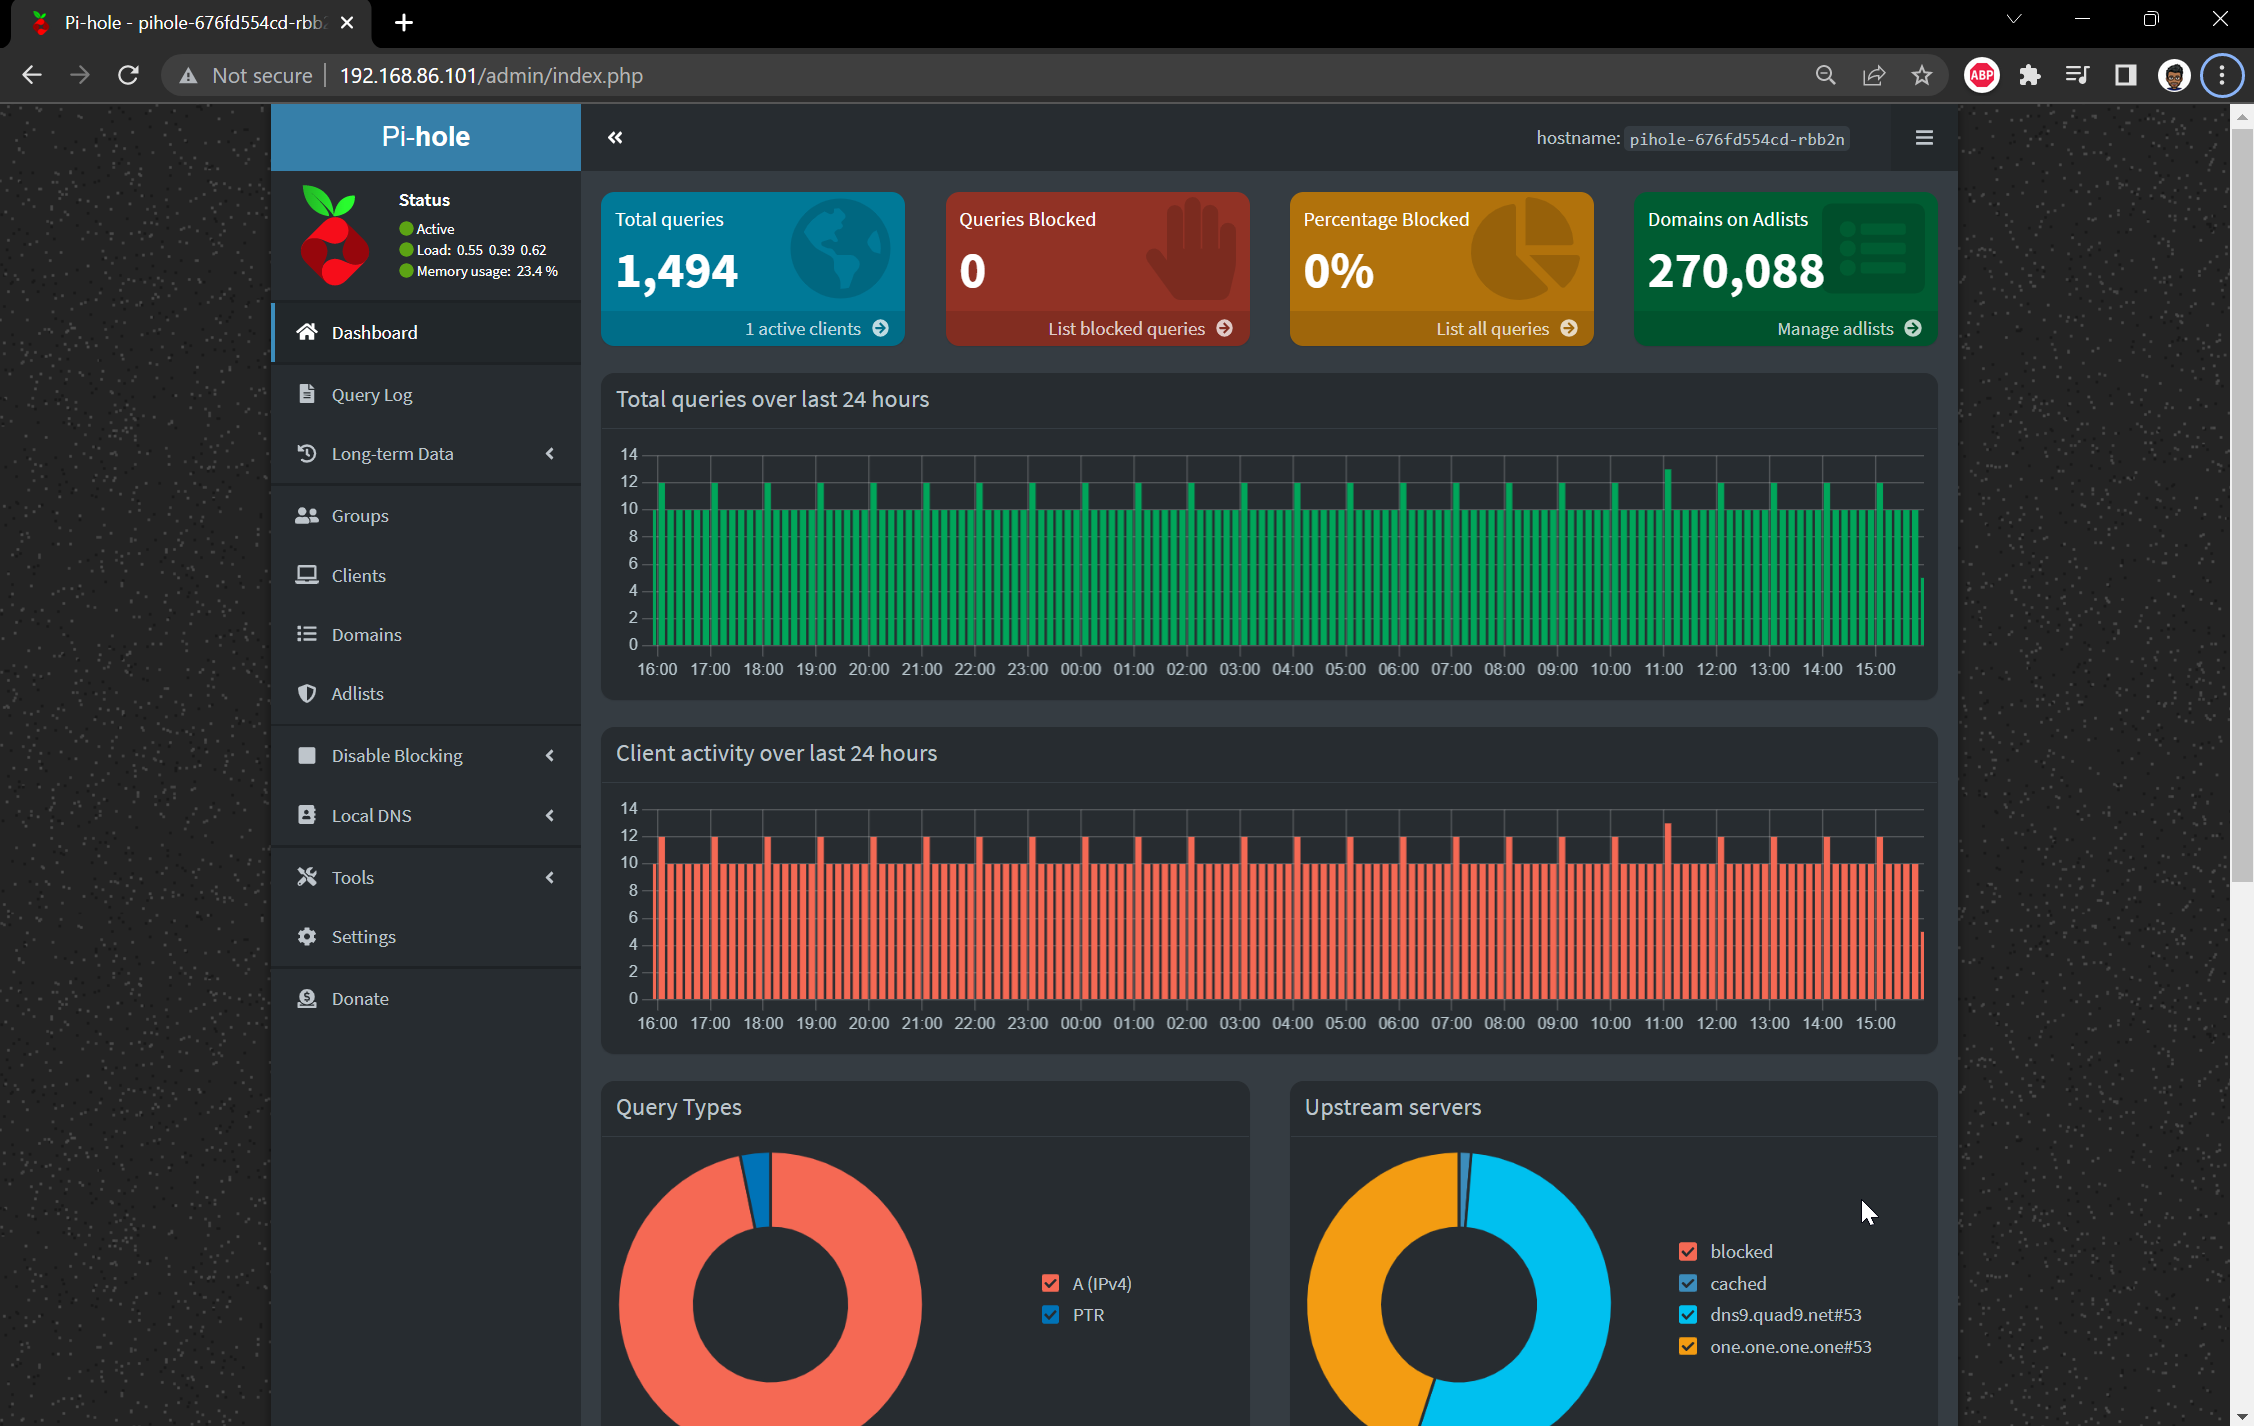
An voila! Happy days. I can now use this as my DNS server, define some local DNS entries and start blocking some ads!

Adguard Home

Installing Adguard Home

I thought I'd try installing Adguard Home slightly differently and use the Kompose tool instead. Kompose is simple, you give it a docker-compose.yaml and it outputs a set of kubernetes manifests for you.

First things first, we need a docker-compose file so I head on over to docker hub to grab one for adguard. The docker-compose file looks like this:

docker-compose.yaml
version: '3.3'
services:
adguard:
container_name: adguardhome
restart: unless-stopped
volumes:
- '/my/own/workdir:/opt/adguardhome/work'
- '/my/own/confdir:/opt/adguardhome/conf'
ports:
- '53:53/tcp'
- '53:53/udp'
- '67:67/udp'
- '68:68/udp'
- '80:80/tcp'
- '443:443/tcp'
- '443:443/udp'
- '3000:3000/tcp'
- '853:853/tcp'
- '784:784/udp'
- '853:853/udp'
- '8853:8853/udp'
- '5443:5443/tcp'
- '5443:5443/udp'
image: run

After installing kompose, all I run kompose convert to give my manifest files. Kompose gives me the following manifest files:

  • adguard-claim0-persistentvolumeclaim.yaml
  • adguard-claim1-persistentvolumeclaim.yaml
  • adguard-deployment.yaml
  • adguard-service.yaml

To see the manifest in detail, I've included them in the Appendix below.

note

I did need to make a slight change to the adguard-service.yaml auto generated file and that was to add the LoadBalancer service type. This tells Kubernetes that I needed and external IP from Metallb

Finally I create a namespace and run all manifests with:

kubectl create namespace adguard
kubectl apply -f adguard/ -n adguard

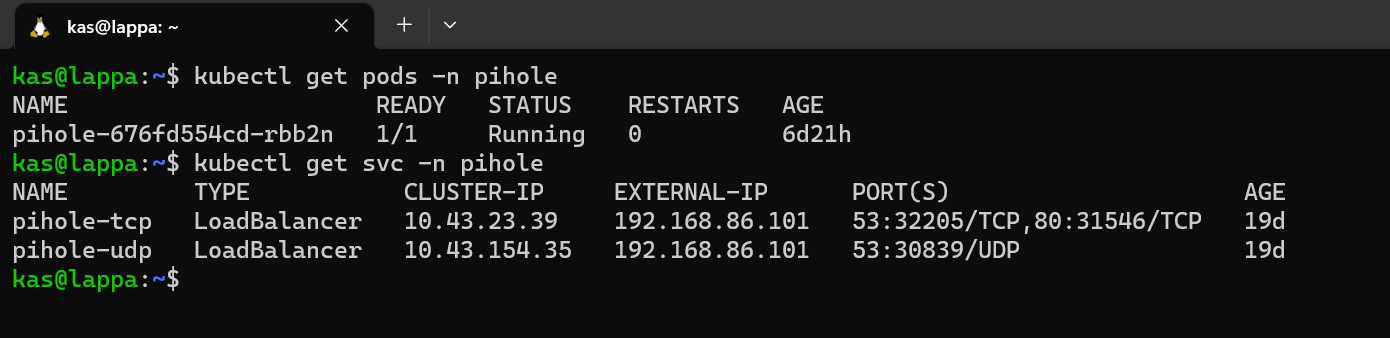
Testing Adguard Home

As with PiHole, I was expecting to see the pods running and an external IP that I could navigate to with my browser:

adguard

Sweet - looks like 192.168.86.102 was allocated.

adguard2

Closing thoughts

Both Pihole and Adguard Home are very similar from a feature set perspective so I haven't really managed to separate them as yet. If I was being super picky I'd say that Pihole is slightly more customisable with blocklists and Adguard Home has a slightly better UI. I haven't decided if one it better than the other so I'll keep them both running for now and switch DNS Servers from time to time.

Appendix

Pihole Manifests

For those interested in the manifests here they are:

Namespace

01-pihole-namespaces.yaml
apiVersion: v1
kind: Namespace
metadata:
name: pihole

Configuration

02-pihole-configs.yaml
apiVersion: v1
kind: ConfigMap
metadata:
name: custom.list
namespace: pihole
data:
custom.list: |
192.168.86.41 k3smaster
192.168.86.40 k3snode01
192.168.86.100 traefik.local.kasj.live
192.168.86.101 pihole.local.kasj.live
192.168.86.100 dash.local.kasj.live
192.168.86.100 grocy.local.kasj.live
192.168.86.100 kuma.local.kasj.live
192.168.86.100 cloud.local.kasj.live
192.168.86.100 portainer.local.kasj.live
192.168.86.100 argocd.local.kasj.live
---
apiVersion: v1
kind: ConfigMap
metadata:
name: adlists.list
namespace: pihole
data:
adlists.list: |
https://raw.githubusercontent.com/StevenBlack/hosts/master/hosts
https://adaway.org/hosts.txt
https://v.firebog.net/hosts/AdguardDNS.txt
https://v.firebog.net/hosts/Admiral.txt
https://raw.githubusercontent.com/anudeepND/blacklist/master/adservers.txt
https://s3.amazonaws.com/lists.disconnect.me/simple_ad.txt
https://v.firebog.net/hosts/Easylist.txt
https://pgl.yoyo.org/adservers/serverlist.php?hostformat=hosts&showintro=0&mimetype=plaintext
https://raw.githubusercontent.com/FadeMind/hosts.extras/master/UncheckyAds/hosts
https://raw.githubusercontent.com/bigdargon/hostsVN/master/hosts
https://v.firebog.net/hosts/static/w3kbl.txt
---
apiVersion: v1
kind: ConfigMap
metadata:
name: whitelist.txt
namespace: pihole
data:
whitelist.txt: |
ichnaea.netflix.com
nrdp.nccp.netflix.com
androidtvchannels-pa.googleapis.com
lcprd1.samsungcloudsolution.net

Deployment

03-pihole-deployment.yaml
as@lappa:~$ cat home-lab/prod-apps/pihole/03-pihole-deployment.yaml
apiVersion: apps/v1
kind: Deployment
metadata:
labels:
app: pihole
name: pihole
namespace: pihole
spec:
replicas: 1
selector:
matchLabels:
app: pihole
strategy:
rollingUpdate:
maxSurge: 1
maxUnavailable: 0
type: RollingUpdate
template:
metadata:
labels:
app: pihole
spec:
containers:
- env:
- name: TZ
value: Australia/Melbourne
- name: WEBPASSWORD
value:
- name: DNS1
value: 9.9.9.9
- name: DNS2
value: 1.1.1.1
image: pihole/pihole:latest
imagePullPolicy: IfNotPresent
name: pihole
ports:
- name: dns-tcp
containerPort: 53
protocol: TCP
- name: dns-udp
containerPort: 53
protocol: UDP
- name: dhcp
containerPort: 67
protocol: UDP
- name: web
containerPort: 80
protocol: TCP
- name: https
containerPort: 443
protocol: TCP
resources:
requests:
cpu: "20m"
memory: "512Mi"
limits:
cpu: "250m"
memory: "896Mi"
readinessProbe:
exec:
command: ['dig', '@127.0.0.1', 'cnn.com']
timeoutSeconds: 20
initialDelaySeconds: 5
periodSeconds: 60
livenessProbe:
tcpSocket:
port: dns-tcp
initialDelaySeconds: 15
periodSeconds: 30
volumeMounts:
- name: etc-pihole
mountPath: /etc/pihole
- name: etc-dnsmasq
mountPath: /etc/dnsmasq.d
- name: var-log
mountPath: /var/log
- name: var-log-lighttpd
mountPath: /var/log/lighttpd
- name: adlists
mountPath: /etc/pihole/adlists.list
subPath: adlists.list
- name: customlist
mountPath: /etc/pihole/custom.list
subPath: custom.list
restartPolicy: Always
volumes:
- name: etc-pihole
emptyDir:
medium: Memory
- name: etc-dnsmasq
emptyDir:
medium: Memory
- name: var-log
emptyDir:
medium: Memory
- name: var-log-lighttpd
emptyDir:
medium: Memory
- name: adlists
configMap:
name: adlists.list
items:
- key: adlists.list
path: adlists.list
- name: customlist
configMap:
name: custom.list
items:
- key: custom.list
path: custom.list

Service

04-pihole-service.yaml
kind: Service
apiVersion: v1
metadata:
name: pihole-udp
namespace: pihole
annotations:
metallb.universe.tf/allow-shared-ip: dns
spec:
selector:
app: pihole
ports:
- protocol: UDP
port: 53
name: dnsudp
targetPort: 53
type: LoadBalancer

---
kind: Service
apiVersion: v1
metadata:
name: pihole-tcp
namespace: pihole
annotations:
metallb.universe.tf/allow-shared-ip: dns
spec:
selector:
app: pihole
ports:
- protocol: TCP
port: 53
name: dnstcp
targetPort: 53
- protocol: TCP
port: 80
name: web
targetPort: 80
type: LoadBalancer

Adguard Manifests

Volume claims

adguard-claim0-persistentvolumeclaim.yaml
apiVersion: v1
kind: PersistentVolumeClaim
metadata:
creationTimestamp: null
labels:
io.kompose.service: adguard-claim0
name: adguard-claim0
spec:
accessModes:
- ReadWriteOnce
resources:
requests:
storage: 100Mi
status: {}
adguard-claim1-persistentvolumeclaim.yaml
apiVersion: v1
kind: PersistentVolumeClaim
metadata:
creationTimestamp: null
labels:
io.kompose.service: adguard-claim1
name: adguard-claim1
spec:
accessModes:
- ReadWriteOnce
resources:
requests:
storage: 100Mi
status: {}

Deployment

adguard-deployment.yaml
apiVersion: apps/v1
kind: Deployment
metadata:
annotations:
kompose.cmd: kompose convert
kompose.version: 1.26.0 (40646f47)
creationTimestamp: null
labels:
io.kompose.service: adguard
name: adguard
spec:
replicas: 1
selector:
matchLabels:
io.kompose.service: adguard
strategy:
type: Recreate
template:
metadata:
annotations:
kompose.cmd: kompose convert
kompose.version: 1.26.0 (40646f47)
creationTimestamp: null
labels:
io.kompose.service: adguard
spec:
containers:
- image: adguard/adguardhome
name: adguardhome
ports:
- containerPort: 53
- containerPort: 53
protocol: UDP
- containerPort: 67
protocol: UDP
- containerPort: 68
protocol: UDP
- containerPort: 80
- containerPort: 443
protocol: UDP
- containerPort: 3000
- containerPort: 853
- containerPort: 784
protocol: UDP
- containerPort: 853
protocol: UDP
- containerPort: 8853
protocol: UDP
- containerPort: 5443
protocol: UDP
resources: {}
volumeMounts:
- mountPath: /opt/adguardhome/work
name: adguard-claim0
- mountPath: /opt/adguardhome/conf
name: adguard-claim1
restartPolicy: Always
volumes:
- name: adguard-claim0
persistentVolumeClaim:
claimName: adguard-claim0
- name: adguard-claim1
persistentVolumeClaim:
claimName: adguard-claim1
status: {}

Service

adguard-service.yaml
apiVersion: v1
kind: Service
metadata:
annotations:
kompose.cmd: kompose convert
kompose.version: 1.26.0 (40646f47)
creationTimestamp: null
labels:
io.kompose.service: adguard
name: adguard
spec:
ports:
- name: "53"
port: 53
targetPort: 53
- name: 53-udp
port: 53
protocol: UDP
targetPort: 53
- name: "67"
port: 67
protocol: UDP
targetPort: 67
- name: "68"
port: 68
protocol: UDP
targetPort: 68
- name: "80"
port: 80
targetPort: 80
- name: "443"
port: 443
targetPort: 443
- name: 443-udp
port: 443
protocol: UDP
targetPort: 443
- name: "3000"
port: 3000
targetPort: 3000
- name: "853"
port: 853
targetPort: 853
- name: "784"
port: 784
protocol: UDP
targetPort: 784
- name: 853-udp
port: 853
protocol: UDP
targetPort: 853
- name: "8853"
port: 8853
protocol: UDP
targetPort: 8853
- name: "5443"
port: 5443
targetPort: 5443
- name: 5443-udp
port: 5443
protocol: UDP
targetPort: 5443
type: LoadBalancer
selector:
io.kompose.service: adguard

· 3 min read
Kas J

Containers and pods are ephemeral, kubernetes provides a great advantage of being able to orchestrate the deployment, scaling, deletion of pods. But what about storage? If we use a pod's local filesystem for a given application and that pod is deleted, the application data disappears with it. To solve for this, we need to leverage kubernetes storage classes. Kubernetes supports a number of various storage classes ranging from public cloud storage offering to local file storage. Think the best option for me is a NFS

Installing an NFS server

So if I were to do this properly, I'd be running a NAS or NFS box but since I've skimped on the hardware, I'll be installing a NFS server on the same server as my cluster. You might be thinking "mate, that's just the same as local storage" and you would be right but I wanted to eventually switch to a separate NAS so figured I'd just learn how to do this.

There are plenty of tutorials available on how to install NFS on Ubuntu but i followed this one. Here are the key commands I took away to get the job done:

Install the NFS server and export /nfs which is accessible by the Kubernetes cluster:

sudo su
apt update && apt -y upgrade
apt install -y nfs-server
exit

mkdir /nfs
cat << EOF >> /etc/exports
/nfs 192.168.86.41(rw,no_subtree_check,no_root_squash)
EOF

systemctl enable --now nfs-server
exportfs -ar

If I ever add another node to my cluster I need to ensure that a NFS client package is installed able to connect to the NFS server but this isn't required as my NFS server is the same as my Kubernetes node:

apt install -y nfs-common

Persistent Volumes

Now that I have a storage location, it is probably worth mentioning that the kubernetes rescource associated to persistent storage is Persistent Volumes. Like any other resource, I can provision persistent volumes declaritively to whatever storage class I specify.

Once a persistent volume is created, an application deployment can leverage the persistent volume using a Persistent Volume Claim. I could be wrong here but I think only one persistent volume claim can be applied to a persistent volume.

Dynamic Provisioning of Persistent Volumes

Kubernetes also provides you the ability to dynamically provision storage to applications. I found a nifty little tool that someone made called NFS subdir external provisioner which is an automatic provisioner that uses your existing and already configured NFS server to support dynamic provisioning of Kubernetes Persistent Volumes via Persistent Volume Claims. Persistent volumes are provisioned as ${namespace}-${pvcName}-${pvName}. To install this I run:

helm repo add nfs-subdir-external-provisioner https://kubernetes-sigs.github.io/nfs-subdir-external-provisioner

helm install nfs-subdir-external-provisioner nfs-subdir-external-provisioner/nfs-subdir-external-provisioner \
--create-namespace \
--namespace nfs-provisioner \
--set nfs.server=192.168.86.41 \
--set nfs.path=/nfs

Testing the provisioner

To test the provisioner I run:

kubectl get sc

nfs

And will use following persistent volume claim manifest:

apiVersion: v1
kind: PersistentVolumeClaim
metadata:
name: nfs-test
labels:
storage.k8s.io/name: nfs
storage.k8s.io/part-of: kubernetes-complete-reference
storage.k8s.io/created-by: ssbostan
spec:
accessModes:
- ReadWriteMany
storageClassName: nfs-client
resources:
requests:
storage: 1Gi

Things of note here:

  • name will vary for each volume claim - I will use the convention of <app_name>-pvc
  • labels doesn't change for my needs
  • accessModes doesn't change for my needs
  • storageClassName doesn't change for my needs
  • storage will vary for the app but worth noting that the whole specified range is provisioned (not just what you use)

That covers all the core cluster services I reckon, time to install some apps!

· 4 min read
Kas J

Automatic Certificate Management Environment (ACME) Certificates can are usually provided through issuers. LetsEncrypt is a nonprofit Certificate Authority that provides free TLS certificates to millions of websites all around the world. This is was good enough for me!

Adding cloudflare token to cert-manager

First I needed a domain name which I purchased through CloudFlare but can be from anywhere really. You guessed it - mine is kasj.live. From there I needed to obtain an cloudflare token which was a personal access token to manage my DNS records in my cloudflare account. I needed this as I needed to provide it to cert-manager, which will be brokering the certificates between letsencrypt and my domain.

Providing cert-manager my cloudflare token could be done with a simple manifest:

secret-cf-token.yaml
apiVersion: v1
kind: Secret
metadata:
name: cloudflare-token-secret
namespace: cert-manager
type: Opaque
stringData:
cloudflare-token: <redacted>

To apply the manifest run:

kubectl apply -f secret-cf-token.yaml

Adding Let's Encrypt as an Issuer to cert-manager

I now need to let cert-manager know that I'll be using Let's Encrypt as my certificate issuer of choice through another manifest:

letsencrypt-production.yaml
apiVersion: cert-manager.io/v1
kind: ClusterIssuer
metadata:
name: letsencrypt-production
spec:
acme:
server: https://acme-v02.api.letsencrypt.org/directory
email: kasunj@gmail.com
privateKeySecretRef:
name: letsencrypt-production
solvers:
- dns01:
cloudflare:
email: kasunj@gmail.com
apiTokenSecretRef:
name: cloudflare-token-secret
key: cloudflare-token
selector:
dnsZones:
- "kasj.live"

and execute using:

kubectl apply -f letsencrypt-production.yaml

Issuing certificates

With the issuer now configured, all I need to do is request for a certificate. I will be hosting all my internal applications under the subdomain local.kasj.live so i will request for a wildcard certicate that covers *.local.kasj.live

The certificate is issued with the following manifest:

local-kasj-live.yaml
apiVersion: cert-manager.io/v1
kind: Certificate
metadata:
name: local-kasj-live
namespace: default
spec:
secretName: local-kasj-live-tls
issuerRef:
name: letsencrypt-production
kind: ClusterIssuer
commonName: "*.local.kasj.live"
dnsNames:
- "local.kasj.live"
- "*.local.kasj.live"

and execute using:

kubectl apply -f local-kasj-live.yaml

Issuing and validating the certificates takes time (20 minutes minimum). To check how things are progressing run:

kubectl get challenges
caution

You'll notice that I use the issuer name letsencrypt-production - I didn't jump straight to this but rather used letsencrypt-staging first to make sure all my configuration was correct. If you jump straight to production but if it doesn't work for whatever reason you might be locked out by letsencrypt for a period of time.

Testing the issued certificate

Once the kubectl get challenges command produces nothing, that's when you know the process is complete. To use a certificate, you need to ensure a couple of things:

  • The certificate needs to be made available in multiple namespaces. The certificate only works if it is deployed in the same namespaces as the service you are using it for. With a bit of googling I've been using the following solution for this.

  • We use Traefik to specify and ingressRoute which essentionally provides traefik with the instructions on where to route traffic hitting the reverse proxy. We can also specify here that a certificate must be used.

To test above, I deployed the Traefik dashboard (with the help of their documentation and TechnoTim) with the following steps:

Create and deploy a middleware manifest that forces https:

middleware.yaml
apiVersion: traefik.containo.us/v1alpha1
kind: Middleware
metadata:
name: traefik-dashboard-basicauth
namespace: traefik
spec:
basicAuth:
secret: traefik-dashboard-auth

Generate a credential whichi is mandatory for the dashboard:

# Generate a credential / password that’s base64 encoded
htpasswd -nb kas <redacted> | openssl base64

Create and apply a manifest to deploy the dashboard. Note you need to use the output from command above for the password:

---
apiVersion: v1
kind: Secret
metadata:
name: traefik-dashboard-auth
namespace: traefik
type: Opaque
data:
users: <redacted hased password which is output from above>

Finally I create a manifest for an ingressRoute which will route traffic from traefik.local.kasj.live to my dashboard using TLS certificate I just created:

traefik-ingress.yaml
apiVersion: traefik.containo.us/v1alpha1
kind: IngressRoute
metadata:
name: traefik-dashboard
namespace: traefik
annotations:
kubernetes.io/ingress.class: traefik-external
spec:
entryPoints:
- websecure
routes:
- match: Host(`traefik.local.kasj.live`)
kind: Rule
middlewares:
- name: traefik-dashboard-basicauth
namespace: traefik
services:
- name: api@internal
kind: TraefikService
tls:
secretName: local-kasj-live-tls

And the results

So now if I navigate to https://traefik.local.kasj.live I can not see the traefik dashboard

traefik

And more importantly with a certificate issued from Let's Encrypt!

cert

· One min read
Kas J

Certificates in K3s

In my previous post I mentioned that Traefik allows me to provide SSL termination certificate handling. The thing is certificates are actually an unknown resource type in the kubernetes ecosystem like "pods" or "services".

cert-manager adds certificates and certificate issuers as resource types in Kubernetes clusters, and simplifies the process of obtaining, renewing and using those certificates.

certmanager

Installing cert-manager

Add customer resource definition (CRD) using a manifest from cert-manager:

kubectl apply -f https://github.com/cert-manager/cert-manager/releases/download/v1.11.0/cert-manager.crds.yaml

Like with traefik, I also created a values.yaml file for the helm installation:

values.yaml
installCRDs: false # Oops didn't realise I could do it here
replicaCount: 1
extraArgs:
- --dns01-recursive-nameservers=1.1.1.1:53,9.9.9.9:53
- --dns01-recursive-nameservers-only
podDnsPolicy: None
podDnsConfig:
nameservers:
- "1.1.1.1"
- "9.9.9.9"

Create namespace, add the repo and update the repo

kubectl create namespace cert-manager
helm repo add jetstack https://charts.jetstack.io
helm repo update

Install cert-manager via helm

helm install cert-manager jetstack/cert-manager --namespace cert-manager --values=values.yaml --version v1.11.0

With cert-manager now installed it was time get some certificates!

· 3 min read
Kas J

Now that I have load balancer to expose my services externally, I have a couple of options:

  • Expose every service I deploy over metallb (ie. each app gets its own IP address) or;
  • Deploy a reverse proxy which intercepts and routes every incoming request to the corresponding backend services.

From the title, you can tell which option I went with. I went with the reverse proxy option because

  • I don't know how many applications I will eventually host
  • I also don't need to think about which application is associated with which IP and configure DNS routes etc
  • It can also provide SSL termination and can be used with an ACME provider (like Let’s Encrypt) for automatic certificate generation (which I'll cover in a future post)

Installing Traefik

Like Metallb, there are heaps of reverse proxy options out there but I went with a popular option Traefik.

traefik

I wanted to try installing this via helm this time. Helm allows you specify custom configuration values via a values.yaml file so I did that first. I know its quite long but I just tweaked the defaults:

values.yaml
globalArguments:
- "--global.sendanonymoususage=false"
- "--global.checknewversion=false"

additionalArguments:
- "--serversTransport.insecureSkipVerify=true"
- "--log.level=INFO"

deployment:
enabled: true
replicas: 1
annotations: {}
podAnnotations: {}
additionalContainers: []
initContainers: []

ports:
web:
redirectTo: websecure
websecure:
tls:
enabled: true

ingressRoute:
dashboard:
enabled: false

providers:
kubernetesCRD:
enabled: true
ingressClass: traefik-external
allowExternalNameServices: true
kubernetesIngress:
enabled: true
allowExternalNameServices: true
publishedService:
enabled: false

rbac:
enabled: true

service:
enabled: true
type: LoadBalancer
annotations: {}
labels: {}
spec:
loadBalancerIP: 192.168.86.100 # this should be an IP in the MetalLB range
loadBalancerSourceRanges: []
externalIPs: []

Then I needed to execute these commands to install via helm (after installing helm of course):

Add repo

helm repo add traefik https://helm.traefik.io/traefik

Update repo

helm repo update

Create namespace

kubectl create namespace traefik

Finally install using helm and our custom values file:

helm install --namespace=traefik traefik traefik/traefik --values=values.yaml

Verifying installation

Finally it was time to check if installation succeeded.

traefikverify

What a beautiful sight, it is all working. The main thing I was happy to see was that Metallb did the job too by assigning the IP 192.168.86.100 to the traefik service. This means I can now route all incoming request (regardless of which application) to this IP and traefik will handle all the routing. This will be done through domain names which will be covered in a later post.

· 3 min read
Kas J

So now I have a cluster - woot! My first thing was to get stuck in and deploying some apps but quickly realised there were a couple of other things that needed to be considered. Say I deployed a web server to my cluster using a small nginx container. It's up and running but how do I access it when it is only routable within my cluster. if you look at the pods IP addresses, they are all 10.1.x.x which is not in my home network.

Well, the answer is I need use a load balancer to expose that web server outside the cluster so that I can see it on my home network. When working in public cloud, these load balancers are usually provided by the cloud providers but I need one for my locally hosted environment.

After a bit of research, I found that metallb is the best solution for this. You give it a "pool" of IP addresses within your home network to allocate to services that you want to expose and it just does it (much like a DHCP server)

Installing applications

So this is my first app that I am going to install on my cluster so it took me a little bit of reading to get to this point but here are my key takeaways of installing this and any app:

  • You can specify kubernetes a manifest which is basically a yaml file which allows you to declaritively specify what you want to install, where to install it from and what configurations you want and how to expose it.
  • Most container applications are containerised with docker and often come with an associated docker-compose file. There is a nifty tool called kompose which allows you to take these docker-compose files and it converts it to a kubernetes manifest for you to allow it to be deployed to your cluster - I plan on using this a lot.
  • Another popular way of installing application is Helm. Helm is a package manager similar to apt (if you're familiar with Ubuntu) which allows you to easily install applications on to your cluster. All you need to do is specify the repo for the application you are wanting to install and it does the rest - I plan on using this a lot too.

Installing metallb

Installing metallb is pretty easy out of the box. You are already provided with manifest to deploy using the kubectl apply command:

kubectl apply -f https://raw.githubusercontent.com/metallb/metallb/v0.13.9/config/manifests/metallb-native.yaml

This installs metallb into a new namespace called metallb-system. Namespaces are a kubenetes construct that basically allow you a way to organise resources within your cluster. I like to think of them as "folders" in a typical file system. So for metallb, all my resources will live in the metallb-system namespace. This allows for easy troubleshooting in the future as I know where they all live.

Configuring metallb

Once installed, there were some configuration changes that needed to be made. As mentioned earlier, I needed to specify a pool of IP address for metallb to allocate out. I put this into another yaml file:

/home-lab/cluster-setup/metallb/metallb-ipconfig.yaml
apiVersion: metallb.io/v1beta1
kind: IPAddressPool
metadata:
name: first-pool
namespace: metallb-system
spec:
addresses:
- 192.168.86.100-192.168.86.110

---
apiVersion: metallb.io/v1beta1
kind: L2Advertisement
metadata:
name: default
namespace: metallb-system

Verifying installation

All done! Here are a few commands to verify my install:

metallbverify

But the real test is if it will allocate an IP to a service. Let's test it with reverse proxy service. Stay tuned as I will cover this in my next post!